In this tutorial, we will create a Node.js application that integrates with the eSewa (ePay V2) payment gateway in Node.js for processing payments. This process involves generating a payment hash for security, initiating a payment request, and verifying the payment status upon completion.
Prerequisites
- Node.js and npm installed
- MongoDB setup for storing payment records
- An eSewa merchant account
Integrating Khalti Payment Gateway with Node.js and MongoDB: A Detailed Guide
Setting Up the Project
- First, create a new directory for your project and initialize a new Node.js application:
mkdir esewa_integration
cd esewa_integration
npm init -y- Install the necessary npm packages:
npm install express body-parser axios dotenv mongoose- Create the Server: In your project directory, create a file named
index.js. This file will serve as the entry point to your application. Add the following code to set up a basic Express server:
const express = require("express");
const bodyParser = require("body-parser");
const app = express();
app.use(bodyParser.json());

if (process.env.NODE_ENV !== "production") {
  require("dotenv").config();
}

app.listen(3001, () => {
  console.log("Backend listening at http://localhost:3001");
});
Configure Environmental Variables
Create a .env file in your project root and add the following keys:
ESEWA_SECRET_KEY= "8gBm/:&EnhH.1/q"
ESEWA_GATEWAY_URL = "https://rc-epay.esewa.com.np"
ESEWA_PRODUCT_CODE = "EPAYTEST"
BACKEND_URI = "http://localhost:3001"
DB_URI = "mongodb://localhost:27017/test1"
Replace the above according to your requirements.
Connecting to MongoDB with Mongoose
Mongoose is an Object Data Modeling (ODM) library for MongoDB and Node.js. It manages relationships between data, provides schema validation, and is used to translate between objects in code and the representation of those objects in MongoDB.
- Set Up Connection: In your project directory, create a file named
db.js. This file will handle the connection to your MongoDB database. Insert the following code:
const mongoose = require("mongoose");

const connectToMongo = async () => {
  await mongoose
    .connect(process.env.DB_URI)
    .then(() => console.log("Connected to MongoDB"))
    .catch((err) => console.error("Could not connect to MongoDB:", err));
};

module.exports = connectToMongo;
- Initialize Connection: In your
index.js, require and call theconnectToMongofunction to establish a connection to MongoDB when your server starts.
const connectToMongo = require("./db");
connectToMongo();
Defining Data Models with Mongoose
With the connection to MongoDB set up, let’s define the models for our data. These models will represent the documents in our MongoDB collections and provide a structure to our data.
- Item Model: Represents the items available for purchase. Create a file named
itemModel.jsand define the schema as follows:
const mongoose = require("mongoose");

const itemSchema = new mongoose.Schema({
  name: { type: String, required: true },
  price: { type: Number, required: true },
  inStock: { type: Boolean, required: true, default: true },
  category: { type: String },
}, { timestamps: true });

const Item = mongoose.model("Item", itemSchema);
module.exports = Item;
- PurchasedItem Model: Tracks items that users have purchased. Create
purchasedItemModel.jswith the schema:
const mongoose = require("mongoose");

const purchasedItemSchema = new mongoose.Schema({
  item: { type: mongoose.Schema.Types.ObjectId, ref: "Item", required: true },
  totalPrice: { type: Number, required: true },
  purchaseDate: { type: Date, default: Date.now },
  paymentMethod: { type: String, enum: ["esewa", "khalti"], required: true },
  status: { type: String, enum: ["pending", "completed", "refunded"], default: "pending" },
}, { timestamps: true });

const PurchasedItem = mongoose.model("PurchasedItem", purchasedItemSchema);
module.exports = PurchasedItem;
- Payment Model: Stores records of payments made. Create
paymentModel.js:
const mongoose = require("mongoose");

const paymentSchema = new mongoose.Schema(
  {
    transactionId: { type: String, unique: true },
    pidx: { type: String, unique: true },
    productId: {
      type: mongoose.Schema.Types.ObjectId,
      ref: "PurchasedItem",
      required: true,
    },
    amount: { type: Number, required: true },
    dataFromVerificationReq: { type: Object },
    apiQueryFromUser: { type: Object },
    paymentGateway: {
      type: String,
      enum: ["khalti", "esewa", "connectIps"],
      required: true,
    },
    status: {
      type: String,
      enum: ["success", "pending", "failed"],
      default: "pending",
    },
    paymentDate: { type: Date, default: Date.now },
  },
  { timestamps: true }
);
const Payment = mongoose.model("payment", paymentSchema);
module.exports = Payment;
Writing the eSewa Integration Logic
In the esewa.js file, we implement two key functions: getEsewaPaymentHash for generating a secure payment hash and verifyEsewaPayment for verifying the payment’s success.
getEsewaPaymentHash({ amount, transaction_uuid })
- Purpose: Generates a secure hash signature to initiate a payment request. This signature confirms that the payment details have not been tampered with when they reach eSewa.
- Parameters:
amount: The total amount of the transaction.transaction_uuid: A unique identifier for the transaction, helping to track and verify it.
- Process:
- Combines the
amount,transaction_uuid, andproduct_codeinto a single string. - Uses the
cryptolibrary to create a SHA256 hash of this string, signing it with your secret key (a unique key provided by eSewa to your merchant account for security purposes). - The hash is then encoded in base64 format to be sent along with the payment request, confirming the integrity of the transaction data.
- Combines the
- Returns: An object containing the generated hash (
signature) and the fields included in the hash (signed_field_names).
const axios = require("axios");
const crypto = require("crypto");

async function getEsewaPaymentHash({ amount, transaction_uuid }) {
  try {
    const data = `total_amount=${amount},transaction_uuid=${transaction_uuid},product_code=${process.env.ESEWA_PRODUCT_CODE}`;

    const secretKey = process.env.ESEWA_SECRET_KEY;
    const hash = crypto
      .createHmac("sha256", secretKey)
      .update(data)
      .digest("base64");

    return {
      signature: hash,
      signed_field_names: "total_amount,transaction_uuid,product_code",
    };
  } catch (error) {
    throw error;
  }
}
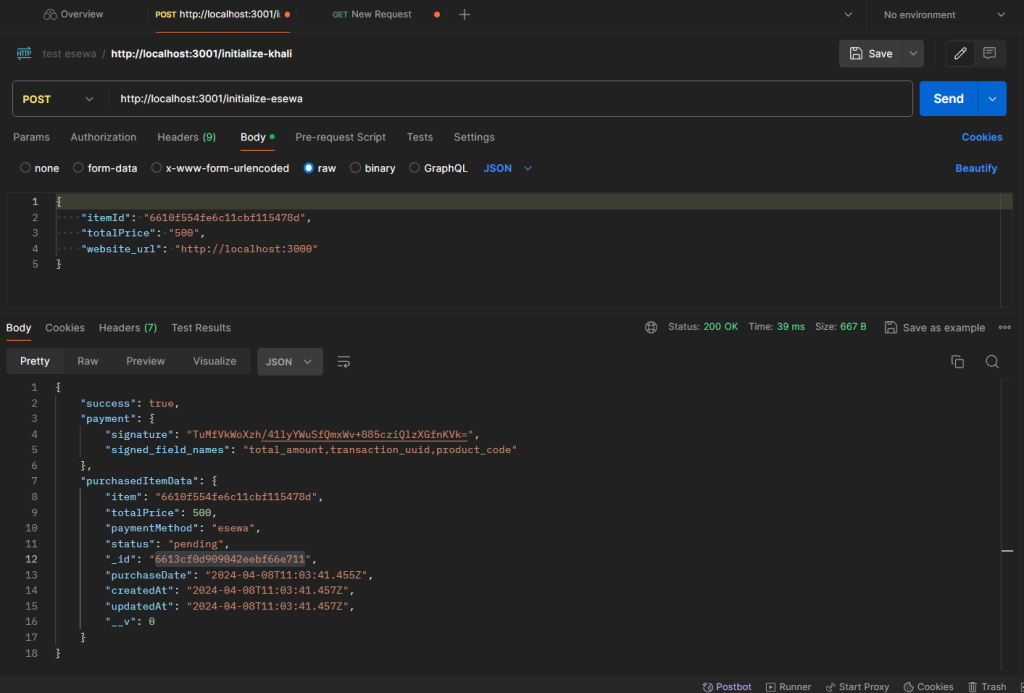
This is how Postman request will look like

verifyEsewaPayment(encodedData)
- Purpose: Verifies the payment’s success and integrity once the payment process is completed, ensuring the details haven’t been altered and that the payment was successful.
- Parameters:
encodedData: Base64 encoded string received from eSewa after a transaction, containing transaction details.
- Process:
- Decodes the
encodedDatafrom Base64 to get the transaction details in JSON format. - Re-constructs a data string with these details and the merchant’s
product_code. - Generates a new hash using the same method as in
getEsewaPaymentHashto compare with the received signature, ensuring the data hasn’t been tampered with. - If the hashes match, it sends a request to eSewa’s API to verify the transaction status using the transaction details.
- Check if the response from eSewa confirms the transaction was completed successfully and matches the transaction details sent for verification.
- Decodes the
- Returns: If successful, it returns an object containing eSewa’s response and the decoded transaction details. If any step fails (e.g., the hashes don’t match or eSewa’s response indicates the transaction wasn’t successful), it throws an error.
async function verifyEsewaPayment(encodedData) {
  try {
    // decoding base64 code revieved from esewa
    let decodedData = atob(encodedData);
    decodedData = await JSON.parse(decodedData);
    let headersList = {
      Accept: "application/json",
      "Content-Type": "application/json",
    };

    const data = `transaction_code=${decodedData.transaction_code},status=${decodedData.status},total_amount=${decodedData.total_amount},transaction_uuid=${decodedData.transaction_uuid},product_code=${process.env.ESEWA_PRODUCT_CODE},signed_field_names=${decodedData.signed_field_names}`;

    const secretKey = process.env.ESEWA_SECRET_KEY;
    const hash = crypto
      .createHmac("sha256", secretKey)
      .update(data)
      .digest("base64");

    console.log(hash);
    console.log(decodedData.signature);
    let reqOptions = {
      url: `${process.env.ESEWA_GATEWAY_URL}/api/epay/transaction/status/?product_code=${process.env.ESEWA_PRODUCT_CODE}&total_amount=${decodedData.total_amount}&transaction_uuid=${decodedData.transaction_uuid}`,
      method: "GET",
      headers: headersList,
    };
    if (hash !== decodedData.signature) {
      throw { message: "Invalid Info", decodedData };
    }
    let response = await axios.request(reqOptions);
    if (
      response.data.status !== "COMPLETE" ||
      response.data.transaction_uuid !== decodedData.transaction_uuid ||
      Number(response.data.total_amount) !== Number(decodedData.total_amount)
    ) {
      throw { message: "Invalid Info", decodedData };
    }
    return { response: response.data, decodedData };
  } catch (error) {
    throw error;
  }
}
Finally, we export both the functions
module.exports = { verifyEsewaPayment, getEsewaPaymentHash };Setting Up the routes
Next, we will define routes to initialize and verify eSewa payments in index.js. import the following files
const { getEsewaPaymentHash, verifyEsewaPayment } = require("./esewa");
const Payment = require("./paymentModel");
const Item = require("./itemModel");
const PurchasedItem = require("./purchasedItemModel");
Initializing eSewa Payment
This endpoint will be called when a user initiates a purchase. It validates the requested item, creates a record for the purchased item, and then initiates a payment process with eSewa.
app.post("/initialize-esewa", async (req, res) => {
  try {
    const { itemId, totalPrice } = req.body;
    // Validate item exists and the price matches
    const itemData = await Item.findOne({
      _id: itemId,
      price: Number(totalPrice),
    });

    if (!itemData) {
      return res.status(400).send({
        success: false,
        message: "Item not found or price mismatch.",
      });
    }

    // Create a record for the purchase
    const purchasedItemData = await PurchasedItem.create({
      item: itemId,
      paymentMethod: "esewa",
      totalPrice: totalPrice,
    });

    // Initiate payment with eSewa
    const paymentInitiate = await getEsewaPaymentHash({
      amount: totalPrice,
      transaction_uuid: purchasedItemData._id,
    });

    // Respond with payment details
    res.json({
      success: true,
      payment: paymentInitiate,
      purchasedItemData,
    });
  } catch (error) {
    res.status(500).json({
      success: false,
      error: error.message,
    });
  }
});
Verifying eSewa Payment
After the payment is completed, eSewa redirects the user to a success URL specified by your application. This endpoint captures the success URL, verifies the payment details with eSewa, and updates the purchase status.
app.get("/complete-payment", async (req, res) => {
  const { data } = req.query; // Data received from eSewa's redirect

  try {
    // Verify payment with eSewa
    const paymentInfo = await verifyEsewaPayment(data);

    // Find the purchased item using the transaction UUID
    const purchasedItemData = await PurchasedItem.findById(
      paymentInfo.response.transaction_uuid
    );

    if (!purchasedItemData) {
      return res.status(500).json({
        success: false,
        message: "Purchase not found",
      });
    }

    // Create a new payment record in the database
    const paymentData = await Payment.create({
      pidx: paymentInfo.decodedData.transaction_code,
      transactionId: paymentInfo.decodedData.transaction_code,
      productId: paymentInfo.response.transaction_uuid,
      amount: purchasedItemData.totalPrice,
      dataFromVerificationReq: paymentInfo,
      apiQueryFromUser: req.query,
      paymentGateway: "esewa",
      status: "success",
    });

    // Update the purchased item status to 'completed'
    await PurchasedItem.findByIdAndUpdate(
      paymentInfo.response.transaction_uuid,
      { $set: { status: "completed" } }
    );

    // Respond with success message
    res.json({
      success: true,
      message: "Payment successful",
      paymentData,
    });
  } catch (error) {
    res.status(500).json({
      success: false,
      message: "An error occurred during payment verification",
      error: error.message,
    });
  }
});
Creating dummy data
This route lets you add a new item to the database, and then you can pay for it using eSewa.
app.get("/create-item", async (req, res) => {
  let itemData = await Item.create({
    name: "Headphone",
    price: 500,
    inStock: true,
    category: "vayo pardaina",
  });
  res.json({
    success: true,
    item: itemData,
  });
});
Testing Route
The test.html file contains a form for initiating the payment process. This form includes the necessary parameters for eSewa payment and points to eSewa epay for payment initiation.
<body data-new-gr-c-s-check-loaded="14.1062.0" data-gr-ext-installed="">
   <b>eSewa ID:</b> 9806800001/2/3/4/5 <br /><b>Password:</b> Nepal@123
   <b>MPIN:</b> 1122 <b>Token:</b>123456
   <form
      action="https://rc-epay.esewa.com.np/api/epay/main/v2/form"
      method="POST"
      target="_blank"
      >
      <br /><br />
      <table>
         <tbody>
            <tr>
               <td><strong>Parameter </strong></td>
               <td><strong>Value</strong></td>
            </tr>
            <tr>
               <td>Amount:</td>
               <td>
                  <input
                     type="text"
                     id="amount"
                     name="amount"
                     value="500"
                     class="form"
                     required=""
                     />
                  <br />
               </td>
            </tr>
            <tr>
               <td>Tax Amount:</td>
               <td>
                  <input
                     type="text"
                     id="tax_amount"
                     name="tax_amount"
                     value="0"
                     class="form"
                     required=""
                     />
               </td>
            </tr>
            <tr>
               <td>Total Amount:</td>
               <td>
                  <input
                     type="text"
                     id="total_amount"
                     name="total_amount"
                     value="500"
                     class="form"
                     required=""
                     />
               </td>
            </tr>
            <tr>
               <td>Transaction UUID (Item Purchase ID):</td>
               <td>
                  <input
                     type="text"
                     id="transaction_uuid"
                     name="transaction_uuid"
                     value="6612d14f0fa8f07dc031ce99"
                     class="form"
                     required=""
                     />
               </td>
            </tr>
            <tr>
               <td>Product Code:</td>
               <td>
                  <input
                     type="text"
                     id="product_code"
                     name="product_code"
                     value="EPAYTEST"
                     class="form"
                     required=""
                     />
               </td>
            </tr>
            <tr>
               <td>Product Service Charge:</td>
               <td>
                  <input
                     type="text"
                     id="product_service_charge"
                     name="product_service_charge"
                     value="0"
                     class="form"
                     required=""
                     />
               </td>
            </tr>
            <tr>
               <td>Product Delivery Charge:</td>
               <td>
                  <input
                     type="text"
                     id="product_delivery_charge"
                     name="product_delivery_charge"
                     value="0"
                     class="form"
                     required=""
                     />
               </td>
            </tr>
            <tr>
               <td>Success URL:</td>
               <td>
                  <input
                     type="text"
                     id="success_url"
                     name="success_url"
                     value="http://localhost:3001/complete-payment"
                     class="form"
                     required=""
                     />
               </td>
            </tr>
            <tr>
               <td>Failure URL:</td>
               <td>
                  <input
                     type="text"
                     id="failure_url"
                     name="failure_url"
                     value="https://developer.esewa.com.np/failure"
                     class="form"
                     required=""
                     />
               </td>
            </tr>
            <tr>
               <td>signed Field Names:</td>
               <td>
                  <input
                     type="text"
                     id="signed_field_names"
                     name="signed_field_names"
                     value="total_amount,transaction_uuid,product_code"
                     class="form"
                     required=""
                     />
               </td>
            </tr>
            <tr>
               <td>Signature:</td>
               <td>
                  <input
                     type="text"
                     id="signature"
                     name="signature"
                     value="4Ov7pCI1zIOdwtV2BRMUNjz1upIlT/COTxfLhWvVurE="
                     class="form"
                     required=""
                     />
               </td>
            </tr>
            <tr>
               <td>Secret Key:</td>
               <td>
                  <input
                     type="text"
                     id="secret"
                     name="secret"
                     value="8gBm/:&EnhH.1/q"
                     class="form"
                     required=""
                     />
               </td>
            </tr>
         </tbody>
      </table>
      <input
         value=" Pay with eSewa "
         type="submit"
         class="button"
         style="
         display: block !important;
         background-color: #60bb46;
         cursor: pointer;
         color: #fff;
         border: none;
         padding: 5px 10px;
         "
         />
   </form>
</body>
You can also serve this file in the Express app by adding it to your index.js file:
app.get("/", function (req, res) {
  res.sendFile(__dirname + "/test.html");
});
To run the app now run node index.js and enjoy.
Conclusion
You’ve successfully integrated the eSewa payment gateway into your Node.js application with these steps. This setup allows you to initiate payment requests to eSewa and verify their status, ensuring a seamless transaction flow. Remember to handle payment verifications securely and verify each transaction’s integrity through your backend.


