This guide will dive deep into integrating the Khalti payment (ePayment) gateway into a Node.js application, with MongoDB as the backbone for data storage. This step-by-step tutorial is designed to help developers seamlessly incorporate online payment functionalities, enhancing their web applications’ user experience and operational efficiency.
Khalti Payment Gateway Official Documentation
Prerequisites
Before we begin, ensure you have the following prerequisites covered:
- Node.js installed on your system.
- A MongoDB database is set up, either locally or hosted.
- An account with Khalti to access their payment gateway API and obtain necessary API keys.
Setting Up the Node.js Server
First, we set up an Express.js server. Express.js is a web application framework for Node.js, designed for building web applications and APIs. It’s known for its performance and minimalism.
- Initialize a Node.js Project: Create a new directory for your project and initialize it with
npm init. This command creates apackage.jsonfile in your project directory. - Install Dependencies: Install Express.js and other required packages using NPM. Run the following command
npm install express body-parser dotenv mongoose axios- Create the Server: In your project directory, create a file named
index.js. This file will serve as the entry point to your application. Add the following code to set up a basic Express server:
const express = require("express");
const bodyParser = require("body-parser");
const app = express();
app.use(bodyParser.json());

if (process.env.NODE_ENV !== "production") {
  require("dotenv").config();
}

app.listen(3001, () => {
  console.log("Backend listening at http://localhost:3001");
});
Connecting to MongoDB with Mongoose
Mongoose is an Object Data Modeling (ODM) library for MongoDB and Node.js. It manages relationships between data, provides schema validation, and is used to translate between objects in code and the representation of those objects in MongoDB.
- Set Up Connection: In your project directory, create a file named
db.js. This file will handle the connection to your MongoDB database. Insert the following code:
const mongoose = require("mongoose");

const connectToMongo = async () => {
  await mongoose
    .connect(process.env.DB_URI)
    .then(() => console.log("Connected to MongoDB"))
    .catch((err) => console.error("Could not connect to MongoDB:", err));
};

module.exports = connectToMongo;
- Initialize Connection: In your
index.js, require and call theconnectToMongofunction to establish a connection to MongoDB when your server starts.
const connectToMongo = require("./db");
connectToMongo();
Defining Data Models with Mongoose
With the connection to MongoDB set up, let’s define the models for our data. These models will represent the documents in our MongoDB collections and provide a structure to our data.
- Item Model: Represents the items available for purchase. Create a file named
itemModel.jsand define the schema as follows:
const mongoose = require("mongoose");

const itemSchema = new mongoose.Schema({
  name: { type: String, required: true },
  price: { type: Number, required: true },
  inStock: { type: Boolean, required: true, default: true },
  category: { type: String },
}, { timestamps: true });

const Item = mongoose.model("Item", itemSchema);
module.exports = Item;
- PurchasedItem Model: Tracks items that users have purchased. Create
purchasedItemModel.jswith the schema:
const mongoose = require("mongoose");

const purchasedItemSchema = new mongoose.Schema({
  item: { type: mongoose.Schema.Types.ObjectId, ref: "Item", required: true },
  totalPrice: { type: Number, required: true },
  purchaseDate: { type: Date, default: Date.now },
  paymentMethod: { type: String, enum: ["khalti"], required: true },
  status: { type: String, enum: ["pending", "completed", "refunded"], default: "pending" },
}, { timestamps: true });

const PurchasedItem = mongoose.model("PurchasedItem", purchasedItemSchema);
module.exports = PurchasedItem;
- Payment Model: Stores records of payments made. Create
paymentModel.js:
const mongoose = require("mongoose");

const paymentSchema = new mongoose.Schema(
  {
    transactionId: { type: String, unique: true },
    pidx: { type: String, unique: true },
    productId: {
      type: mongoose.Schema.Types.ObjectId,
      ref: "PurchasedItem",
      required: true,
    },
    amount: { type: Number, required: true },
    dataFromVerificationReq: { type: Object },
    apiQueryFromUser: { type: Object },
    paymentGateway: {
      type: String,
      enum: ["khalti", "esewa", "connectIps"],
      required: true,
    },
    status: {
      type: String,
      enum: ["success", "pending", "failed"],
      default: "pending",
    },
    paymentDate: { type: Date, default: Date.now },
  },
  { timestamps: true }
);
const Payment = mongoose.model("payment", paymentSchema);
module.exports = Payment;
Implementing Khalti Payment Integration
With our data models in place, we can now focus on integrating the Khalti payment gateway into our application.
- Setting Up Khalti API Calls: Create a file named
khalti.js. This file will contain functions to interact with Khalti’s API for payment initialization and verification. Utilize Axios for HTTP requests:
const axios = require("axios");

// Function to verify Khalti Payment
async function verifyKhaltiPayment(pidx) {
  const headersList = {
    "Authorization": `Key ${process.env.KHALTI_SECRET_KEY}`,
    "Content-Type": "application/json",
  };

  const bodyContent = JSON.stringify({ pidx });

  const reqOptions = {
    url: `${process.env.KHALTI_GATEWAY_URL}/api/v2/epayment/lookup/`,
    method: "POST",
    headers: headersList,
    data: bodyContent,
  };

  try {
    const response = await axios.request(reqOptions);
    return response.data;
  } catch (error) {
    console.error("Error verifying Khalti payment:", error);
    throw error;
  }
}

// Function to initialize Khalti Payment
async function initializeKhaltiPayment(details) {
  const headersList = {
    "Authorization": `Key ${process.env.KHALTI_SECRET_KEY}`,
    "Content-Type": "application/json",
  };

  const bodyContent = JSON.stringify(details);

  const reqOptions = {
    url: `${process.env.KHALTI_GATEWAY_URL}/api/v2/epayment/initiate/`,
    method: "POST",
    headers: headersList,
    data: bodyContent,
  };

  try {
    const response = await axios.request(reqOptions);
    return response.data;
  } catch (error) {
    console.error("Error initializing Khalti payment:", error);
    throw error;
  }
}

module.exports = { verifyKhaltiPayment, initializeKhaltiPayment };
- Creating API Endpoints: In your
index.jsfile, set up routes for initializing and verifying Khalti payments. Here, we handle requests to initiate a payment, verify it upon completion, and update our database records accordingly:
Part 1: Initializing a Payment with Khalti
- What it does: This part sets up everything needed to start a payment process. When someone wants to buy an item on the website, this code talks to Khalti’s system to prepare for the payment.
- How it works:
- Get Details: It first gets details about what is being bought (like the item ID and its price) from the user’s request.
- Check Item: It checks if the item is actually available in the database with the correct price.
- Record Purchase: If the item exists, it records this purchase in the system but marks it as not paid yet.
- Talk to Khalti: Then, it sends information to Khalti (like how much the item costs) to prepare Khalti to handle the payment. Khalti sends back details on how to proceed with the payment.
- Send Payment Info: Finally, these details are sent back to the user so they can complete the payment on Khalti’s platform.
const { initializeKhaltiPayment, verifyKhaltiPayment } = require("./khalti");
const Payment = require("./paymentModel");
const PurchasedItem = require("./purchasedItemModel");
const Item = require("./itemModel");


// route to initilize khalti payment gateway
app.post("/initialize-khali", async (req, res) => {
  try {
    //try catch for error handling
    const { itemId, totalPrice, website_url } = req.body;
    const itemData = await Item.findOne({
      _id: itemId,
      price: Number(totalPrice),
    });

    if (!itemData) {
      return res.status(400).send({
        success: false,
        message: "item not found",
      });
    }
    // creating a purchase document to store purchase info
    const purchasedItemData = await PurchasedItem.create({
      item: itemId,
      paymentMethod: "khalti",
      totalPrice: totalPrice * 100,
    });

    const paymentInitate = await initializeKhaltiPayment({
      amount: totalPrice * 100, // amount should be in paisa (Rs * 100)
      purchase_order_id: purchasedItemData._id, // purchase_order_id because we need to verify it later
      purchase_order_name: itemData.name,
      return_url: `${process.env.BACKEND_URI}/complete-khalti-payment`, // it can be even managed from frontedn
      website_url,
    });

    res.json({
      success: true,
      purchasedItemData,
      payment: paymentInitate,
    });
  } catch (error) {
    res.json({
      success: false,
      error,
    });
  }
});
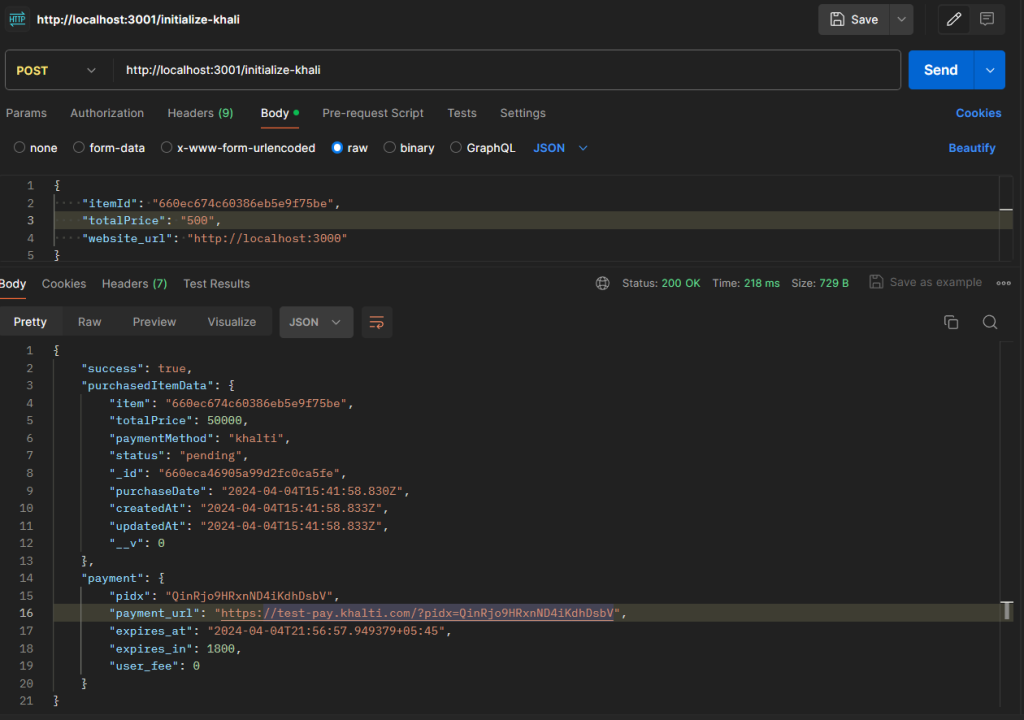
Here’s how a postman request appears: go to the payment.payment_url link to make your payment through Khalti.

Part 2: Verifying the Payment
- What it does: After the payment is made on Khalti, this part checks to make sure everything went through correctly.
- How it works:
- Get Payment Details: Once the payment is done, Khalti sends back details about the transaction. The system captures these details.
- Verify with Khalti: The system then double-checks with Khalti to ensure the payment was successful and matches the purchase.
- Update Records: If Khalti confirms the payment, the system updates the purchase record to show the payment was completed successfully.
- Record Payment: It also keeps a separate record of the payment details for future reference.
- Confirm Success: Finally, it sends a confirmation response back, indicating the payment was successful.
// it is our `return url` where we verify the payment done by user
app.get("/complete-khalti-payment", async (req, res) => {
  const {
    pidx,
    txnId,
    amount,
    mobile,
    purchase_order_id,
    purchase_order_name,
    transaction_id,
  } = req.query;

  try {
    const paymentInfo = await verifyKhaltiPayment(pidx);

    // Check if payment is completed and details match
    if (
      paymentInfo?.status !== "Completed" ||
      paymentInfo.transaction_id !== transaction_id ||
      Number(paymentInfo.total_amount) !== Number(amount)
    ) {
      return res.status(400).json({
        success: false,
        message: "Incomplete information",
        paymentInfo,
      });
    }

    // Check if payment done in valid item
    const purchasedItemData = await PurchasedItem.find({
      _id: purchase_order_id,
      totalPrice: amount,
    });

    if (!purchasedItemData) {
      return res.status(400).send({
        success: false,
        message: "Purchased data not found",
      });
    }
    // updating purchase record
    await PurchasedItem.findByIdAndUpdate(
      purchase_order_id,

      {
        $set: {
          status: "completed",
        },
      }
    );

    // Create a new payment record
    const paymentData = await Payment.create({
      pidx,
      transactionId: transaction_id,
      productId: purchase_order_id,
      amount,
      dataFromVerificationReq: paymentInfo,
      apiQueryFromUser: req.query,
      paymentGateway: "khalti",
      status: "success",
    });

    // Send success response
    res.json({
      success: true,
      message: "Payment Successful",
      paymentData,
    });
  } catch (error) {
    console.error(error);
    res.status(500).json({
      success: false,
      message: "An error occurred",
      error,
    });
  }
});- Your .env file must look like this:
BACKEND_URI = "http://localhost:3001"
KHALTI_SECRET_KEY= "get it from khalti merchat website" #https://test-admin.khalti.com/#/join/merchant
KHALTI_GATEWAY_URL = "https://a.khalti.com"
DB_URI = "mongodb://localhost:27017/test1"
Now run this command on your terminal to start the app.
node index.jsConclusion and Best Practices
Integrating the Khalti payment gateway into a Node.js application provides a streamlined and secure way for users to complete transactions. While the steps provided outline the core process, remember to:
- Securely handle API keys and sensitive information using environment variables.
- Validate user input to protect against injection attacks.
- Implement comprehensive error handling for a better user experience.
- Test payment flows thoroughly in a development environment before going live.
With attention to detail and adherence to best practices, you can enhance your application’s payment functionalities, providing a smooth and secure user experience.


